Don’t want to rely on the big names? Try this private DIY home controller
One of the main points of building a smart home is so that you can have a home that’s easier to control and that can react automatically, making your life easier and more convenient. While there are plenty of mainstream systems that do this, from Amazon Alexa to Samsung SmartThings, they rely on giving data to big companies.
With the WebThings Gateway (previously known as Mozilla Things), you can build your own home automation server with a Raspberry Pi.
Read next: How to set up and use Home Assistant
The WebThings Gateway allows you to control multiple smart home devices from a simple and secure web portal, which can be accessed at home and remotely.
WebThings Gateway allows you to link your existing smart home kit, such as bulbs from Philips Hue; however, you can also add Z-Wave and Zigbee USB dongles and connect devices directly, such as a number of off the shelf smart switches, dimmers and sensors, as well as, Ikea and Cree bulbs.
It also enables you to create If This Then That (IFTTT) style rules, a floor plan and use (limited) voice controls.
• A Raspberry Pi board – preferably a Pi 3 or Pi 4 with Wi-Fi built-in, but a Wi-Fi dongle should work too.
• A clean microSD card with minimum 4GB storage.
• A compatible Zigbee USB dongle and/or a Z-Wave enabled USB stick to communicate with devices on that protocol.
• Some compatible smart home devices to add. Here’s the list of tested devices.
The first thing you need to do is download WebThings Gateway software onto your Mac or PC. It can be downloaded from WebThings directly.
From here you’ll need to flash the software to your clean SD card. There are many pieces of Mac and PC software that can do this, but I’d recommend Etcher.
Once you’ve installed Etcher, insert the microSD card into your computer (note: the way I achieved this on my 12-inch Apple MacBook is pretty comical, pictured above but you can also get USB-C card readers).
All you need to do in Etcher is select the image from your hard drive, select the drive and hit Flash. It’ll take a few minutes, but after that you’ll be good to go.
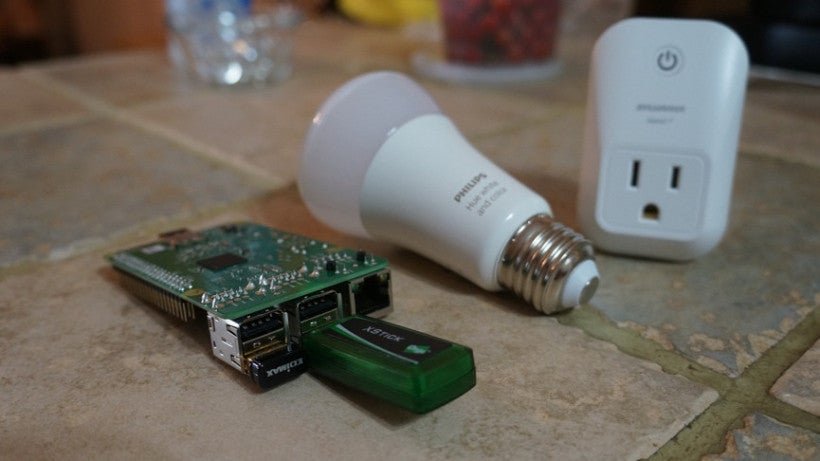
Now it’s almost time to fire up the Raspberry Pi. Before powering it on, you need to insert the SD card loaded with the Things Gateway software. You’ll also need to insert the Zigbee and/or Z-Wave USB dongles. We used the Digi XStick (ZB mesh version).
If your Pi doesn’t have Wi-Fi built-in, you can insert a USB Wi-Fi adapter. Because this will be operated as a ‘headless’ machine you don’t need to worry about attaching a monitor, keyboard or any other accessories to the Pi.
Now you can fire up the Pi.
This is where the clever part starts. After a minute or two you should see a Wi-Fi network called “WebThings Gateway XXXX” where XXXX is four digit’s from your Pi’s MAC address. Connect to this network ID on your laptop or smartphone and you’ll get a pop-up window asking you to input the SSID and password for your home network.
The Gateway will connect to your home network and the pop-up will disappear. Reconnect to your home’s network. Then fire up a browser and enter this address: http://gateway.local and you should connect to the WebThings web management page.
This didn’t work at first, and I had to go into my router’s connected devices section and find the Raspberry Pi in the list to get its IP address. I could then connect using this (http://192.168.0.90).
Next, you need to create your own domain name (xxx.webthings.io). This is the address that you can type into any browser to remote control your home. You’ll need to provide your email address, too, and then confirm your selection via the link in the email that you’re sent. Finally, create a user account for your system.
To make your WebThings Gateway useful, you’ll need to add devices. How you do it depends on the type of device. Zigbee or Z-Wave devices can be added directly, but any third-party system that you connect to via the network, such as Hue lights connected via a Bridge, have to be added in a different way.
We’ll start with Zigbee or Z-Wave devices.
Once set up is complete you’ll be taken straight to the Things Gateway home screen. You’ll see a ‘+’ in the bottom right corner and the Gateway will scan for available devices, so make sure they’re plugged in.
I tested this with a Sylvania Smart Plug compatible with the Zigbee IoT standard, which was quickly recognised by the Digi XStick USB stick. You can give it a custom name and then save it. The switch now appears on the Things homepage and can be turned on/off with a tap/click exactly as advertised.
To add devices that are already set up using the original manufacturer’s app, you need to go to the main menu (click the Arrow at the top-left and then click the Hamburger menu) and click Settings.
Click Add-ons and then click the + button at the bottom right of the screen. Here, you’ll see a list of all supported devices, such as Sonos and Philips Hue.
Add the plugins that you want and then go to Things, and hit the Plus button to discover items on your network. Your devices should be discovered but with Hue you need to hit the button on the front of the Hue Bridge first.
You’ll get a list of discovered devices. Click Save next to any that you want to add into WebThings. Click Done when you’re finished.
On the Things page, you’ll see everything that has been connected to your server. For any device that can be toggled on or off, you can just click the icon to control it.
For more control, click the little splat icon next to the icon to get a full list of controls. With Hue bulbs, for example, you can change the colour and brightness in this screen.
You don’t get scenes pulled in from Hue and you can’t group multiple devices into groups, which is a shame.
If you want to automate your home, you can click on the main menu and select Rules, then click the Plus icon at the bottom of the page. You can drag devices, listed at the bottom of the page, to either the input or output section.
You’ll see that as well as devices, you get some built-in extras, such as Time of Day.
The input section is the trigger section, and you select the properties you want. Here, I’ve got a Rule that says if the time of day is 9am and there’s motion on the sensor, then the rule is triggered. In the output section (the action), I’ve turned on two lights.
Note that you don’t get much flexibility, and can’t set a Rule to run between certain hours, for example. You can change the option for triggers from ‘And’ (they all have to be true) to Or (either input has to be true).
If you look in the Add-ons section, you’ll find that there are handy extras. For example, you can setup the Weather section to give you weather forecasts, which you can use to trigger Rules.
It’s not that user friendly to setup, and once installed you need to hit the Configure button and provide your address in latitude and longitude (www.latlong.net is useful here), and provide an API Key (use openweathermap).
For example, you can link the smart switch controlling your TV to the living room lamp and switch both off at the same time. You can turn on the bedroom lamp and switch on the coffee pot connected to the smart switch.
You can even upload your own floor plan of your home and position your devices accordingly. This offers another way to control devices on a room-to-room basis.
There’s now voice control via an add-on, which will listen for the wake word (Hey, WebThings). This requires a microphone and speaker to be connected to your Pi server, and I’ve not been able to test it.


